How Disney Magic Inspires My Classroom

Do you have a happy place? You know, somewhere you can go and just feel relaxed, a sense of home, and you never want to leave. For me, that place is Disney World and I love to bring that into my classroom. In fact, the Disney corporation and how they approach their projects through an imagineering lens, is exactly how I teach my students to view their STEAM projects.

I had the opportunity to sit down and talk with Lauren Barack, a writer for K-12Dive.com. You can read more about how I use the imagineering lens to approach projects in my classroom as I teach our future engineers, writers, illustrators, and more.

Read here: How Disney’s magic can inspire students in STEAM - From the physics behind a roller coaster to the engineering in a light projection show, Disney parks offer a variety of STEAM lessons on- and offsite.

Free 3Doodler Snowflake Lesson

It’s that time of year where the cold temperatures have set in, we all dream of snow, and we’re trying to keep students engaged. Ok maybe you’re from Florida, but don’t we all love a nice winter wonderland every once in a while? You can get just that with this free 3Doodler snowflake lesson.

I teamed up with 3Doodler, a company that makes 3D-printing hands-on and accessible for students of all ages, to write a lesson about engaging students during a season when it can be difficult. All you need are your own 3Doodler pens and the rest of the resources are broken down for you. So grab your pens and head on over to Doodle Snowflakes: Geometry and Symmetry.


Are you looking for more ideas to use your 3Doodler pens? Then check out my other blogs to get your ideas flowing:

10 Reasons to Fall in Love with 3Doodler Start

3Doodler Teacher Spotlight

3Doodler STEAM Education

Ozobot Parade of Learning

One of my favorite things to do as a STEAM teacher is to combine coding with a hands-on building project. This way students get exposed to multiple career paths within the same project, and Ozobot lends itself to doing this in a very easy way.

As a robot, Ozobot teaches students the basics of coding and computer science. They learn the the effects of sequencing, following the rules that are needed for Ozobot to operate successfully, failure and persistence to get the code working correctly, and more. Once students understand how to code Ozobot, I like to add an additional challenge. One that gets students thinking outside-of-the-box.

Cue the Ozobot Parade of Learning.

I went with ooption 3, so students had a lot of testing and revising to do as they discovered how weight distribution worked with their ozobot.

I went with ooption 3, so students had a lot of testing and revising to do as they discovered how weight distribution worked with their ozobot.

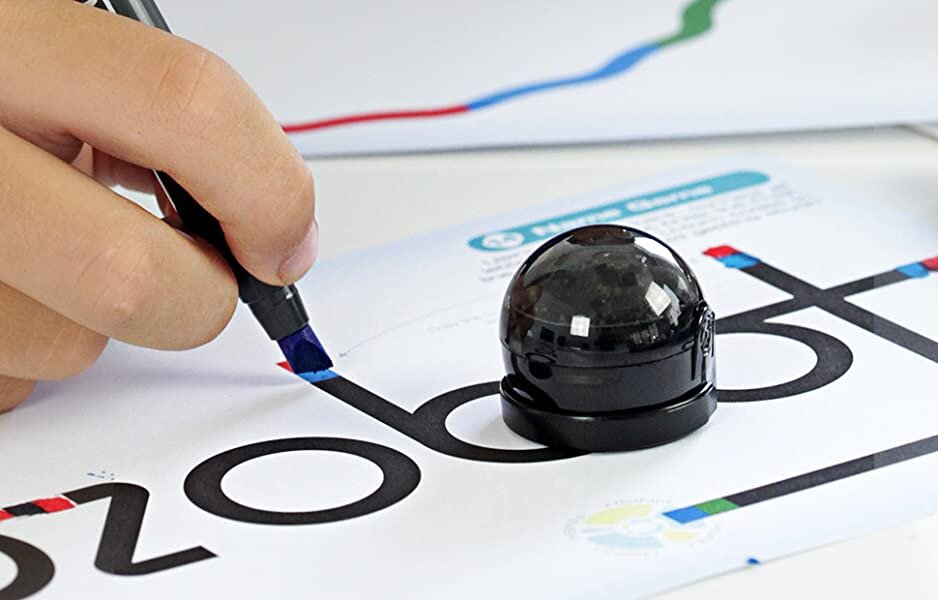
So what does this mean? I have students build their own parade route for their parade “floats” to navigate through the route. This is the coding/computer science aspect of the project. Then I give them a design challenge - to create a float for the parade. Depending on what we are learning at the time, the floats may have to display content that they have learned, describe something about themselves, a holiday, historical figure, or anything that the students want to display. You see, this project lends itself to a variety of different ways to display learning!

In order to present the challenge to students, you must think about the materials that are needed for building. There are a few different ways you can present this challenge.

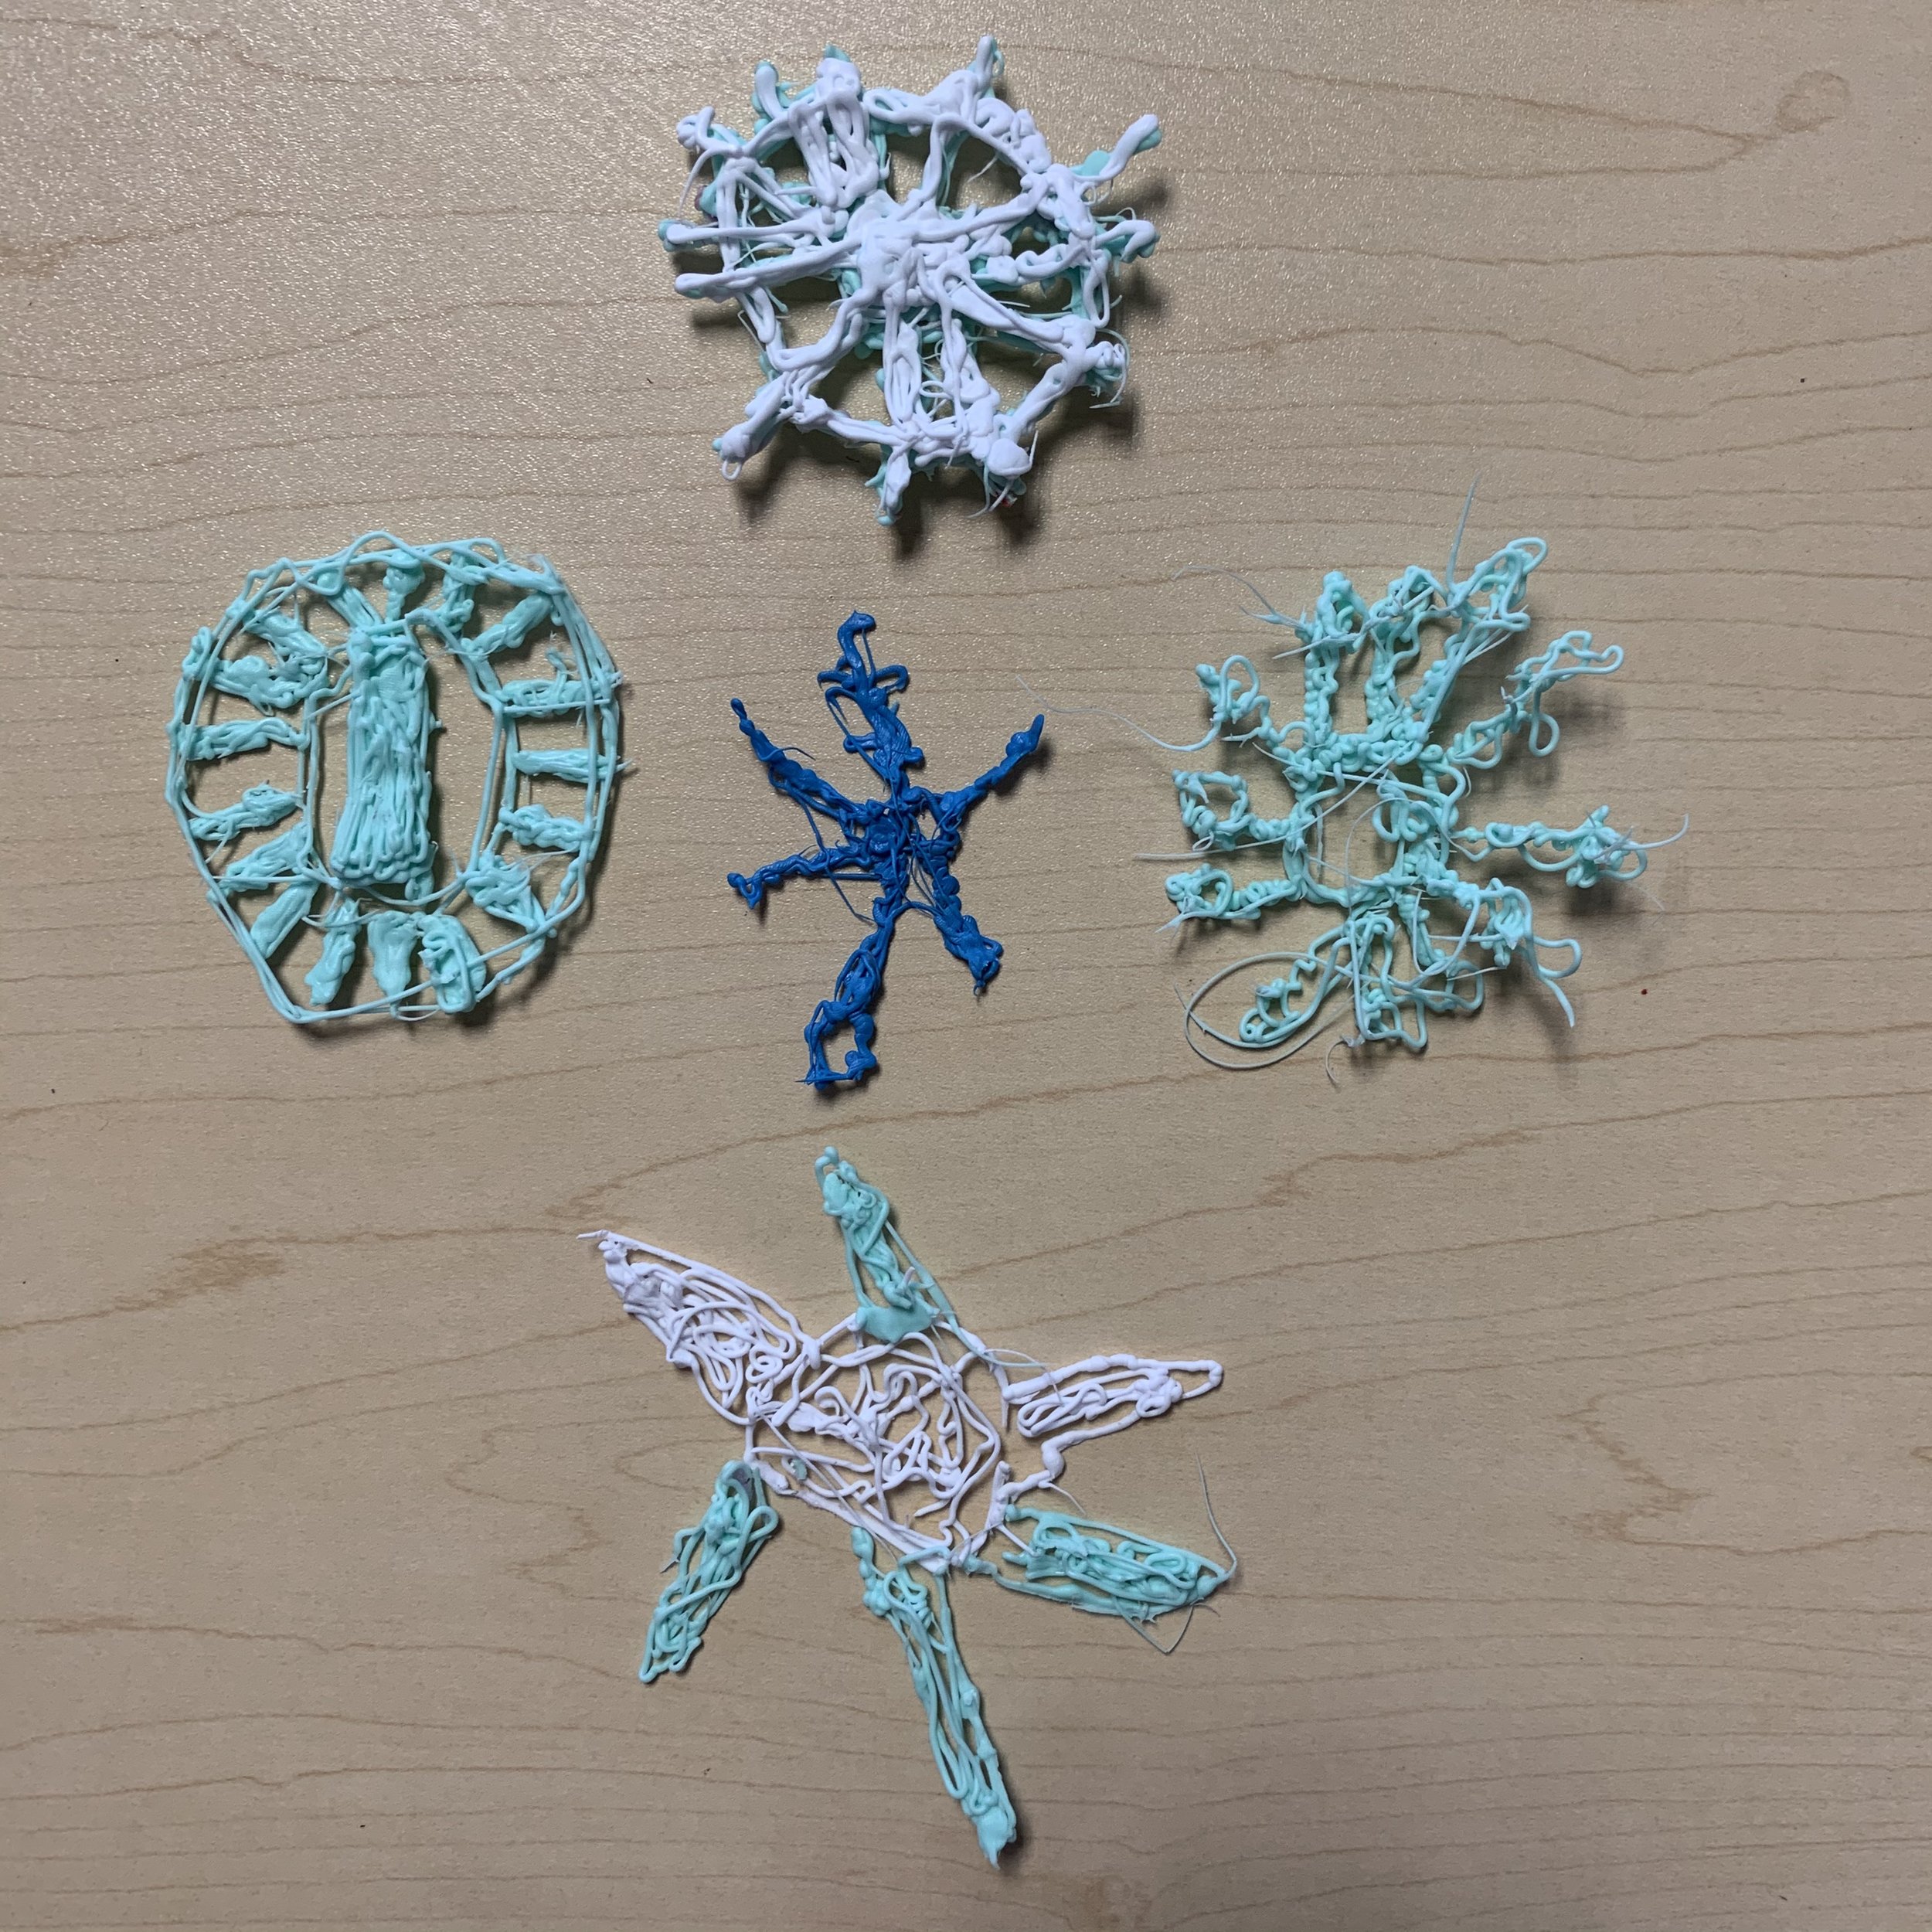
  1. Give students 3 supplies - balloon, string, markers.

  2. Provide specific and limited resources for students to utilize when building.

  3. Give students a more open approach for supplies and let them

You should decide which approach to utilize for your students based on their age and experience with STEAM projects. The more comfortable students are with the engineering design cycle, then I would be more inclined to go towards option 3. This type of approach will be challenge students to test weight, balance, creativity, design, detail, learned content, and more. While option 1 provides an avenue of total success for students because we know that the Ozobot can travel successfully through the code with a balloon attached to it.

I first used this project with my 5th grade students and they absolutely loved it! They learned about the origin of the Macy’s Day Parade, displayed something that was unique to their interests, showed persistence, recognized failures and successes, and so much more.

And the best part of the Parade of Learning? It is adaptable to any grade level and any content area! So I challenge you to do this with your students this year. I promise, you won’t be sorry!

a finished product of one fifth grade class as they conducted their own macy’s day parade.

a finished product of one fifth grade class as they conducted their own macy’s day parade.

Breakout EDU Summer Fun at Home

The summer is officially in full swing, and some people have come to the point where it’s hot, too hot to go outside, and you’ve watched all of the movies. You’re ready for something different. Your kids are ready for something different.

EbXXw2MWoAcILfC.png

Hello, Breakout EDU!

They have stepped up to help parents and kids alike with their Breakout EDU Summer Fun at Home!

This landing page is loaded with digital escape rooms for your own kids and students alike. Many teachers are keeping in touch with students from last year or they’re looking for resources for virtual learning in the future. Breakout EDU will teach you how to host a digital escape room with students via Zoom. And if you’re looking for physical games to play at-home with your family there are several games available to print and play! Or maybe you’re looking for a quick challenge, then check out their digital mini-games that include 4 short puzzles.

So if you’re in a rut and looking for something new, you’ve come to the right place. Think outside of the box with your family. Keep their critical thinking skills sharp. And have some fun!


Are you looking for more Breakout EDU content? Check out the blogs below that will get you diving deeper and get students thinking critically as their learning!

Breakout EDU Game Designer

Escaping Boredom with Breakout EDU

Top 10 Free Breakout EDU Games

5 Pieces of Technology to Add to Your Classroom

How often do you use technology to support your teaching instruction? For me that’s an easy answer, everyday, throughout the whole day! As a STEAM teacher it’s my job to integrate design learning with technology instruction. However, it is about being meaningful and intentional in connecting technology with the engineering design process and not just handing students a computer or robot and saying go.

Too often teachers find themselves in one of two camps:

  1. They are not aware of the technology resources that can successfully support their instruction.

    OR

  2. They are too afraid to dive into a technology they are not familiar with because of fear of failure in front of their students.

In order to help you break through these barriers, I want to share 5 pieces of technology that are going to help you teach meaningful lessons.

Scratch - This is a block-based visual programming language created by the MIT Media Lab. It is the perfect way for you to introduce your students to coding. They can easily see that the blocks of code chosen will have a direct impact on the event that occurs. You can start small with Hour of Code and build your way up to doing thematic projects.

Makey Makey - This kit allows you to connect everyday objects to computer programs, while learning about circuits. Students can bring inanimate objects like a banana to life as students can touch the banana and a piano will play from their computer! Students will be fascinated by the idea of circuitry and get hands-on experience.

Flipgrid - Let your students’ voices by heard with Flipgrid! This video recording tool allows students to respond to prompts given by the teachers. Students can watch their classmates’ responses, give feedback, and grow in their public speaking skills at the same time.

Lego WeDo - This hands-on learning tool allows students to build robots and learn scientific concepts along the way. It is the perfect introduction to hands-on coding as students also build the robot that will respond to the code. They learn about sequencing of events, processes to build contraptions, and the science behind it all!

Code and Go Mice - These are my favorite tools to introduce coding to my kindergarteners and first graders! The small mice come with cards that I use to have my students lay out their thinking of where they want their mouse to code from the start to the finish. They will allow them to see any errors that they may have in their code before the mouse just starts moving and they forget what they coded. We love to set up a variety of unique mazes to allow the mice to navigate.

Now I’m guessing one of these pieces of technology jumps out to you! I provided a range of FREE (hello, Flipgrid and Scratch!) to more expensive options. If you have the funds to splurge or you’re looking for ideas for a grant, I highly recommend these. I challenge you to just try something. Don’t let fear hold you back. Learn with your students. Remember it’s ok to make mistakes!


Are you looking for more ideas about some of these topics? Then check out the blog posts below!

Want to learn more about the basics of Flipgrid? Then checkout my blog post - What is Flipgrid?

You just want more STEAM ideas in general? Then checkout my blog post - 5 STEAM Things I Can’t Live Without.

Top 5 STEAM Team Building Activities

As a STEAM Teacher, I’m a huge believer in getting students to work together. In fact, I rarely have a project where my students don’t at least work with a partner. I want them to be comfortable sharing ideas, finding their strengths, and building one another up.

However, being a strong team player may not come easy for all students. If we think about any of our classes from the past we can probably immediately identify students who are strong leaders, quiet leaders, students who would rather just blend in, and others who have no interest in working on the project at all. If we reflect on the varying personalities, we can help identify ways to help these students. And one of the best ways is to help students LEARN how to work together. Honestly, working with others doesn’t come naturally for many students. They don’t understand how to both share their ideas and handle the fact that their idea might not be chosen. If we’re all honest with ourselves, as adults, we can probably empathize with our students. So it’s up to us to help our students get to a point where they are strong team players.

In order to do this, we must focus on team building activities, and I don’t mean just doing a random “fun” activity to pass the time at the beginning of the school year. I mean actually working with your students to identify skills that are needed to provide feedback to teammates, how to offer ideas, and how to compromise as a team.

So I want to help YOU. Here are my top 5 STEAM team building activities that I love to do with my students!

  1. Lego Communication - Split students into groups of 2 or 3 and give each group a bucket of LEGOs. Students will sit back to back, while one person builds a LEGO design in about 30 seconds. Once the timer goes off, the other student must build a replica of the first design without ever looking at it. The first student is the eyes as they have to describe exactly what needs to be built. This helps students recognize that they need very specific communication when working together as a team.

  2. Can You Lift It Challenge - One of my students’ favorite challenges because they all work together as one big group. Each student has their own string and they must balance an object on top of a binder ring. You can watch a video and see details about the challenge in the link at the beginning.

  3. Finger Tip Hula Hoop - Ah, yes, the simple, yet hard team building challenge! I split students into groups of 5, and each group gets one hula hoop. They must work together to lower the hula hoop all the way down to the ground, but they can only use 2 fingers each. As they are working the hula hoop must stay balanced the whole time and cannot tilt in anyway. This will definitely take communication and a sense of calm in order to be successful.

  4. Cup Stacking - Gather 6 - 10 cups, string, and a rubber band. Tie one string around the rubber band for each person on the team. For example, if you want teams of 3, you should only have 3 strings tied to the rubber band. The teams work together to stack the cups into a pyramid shape.

  5. Minute to Win It Games - I’m not sure who loves these games more - me or my students! The gist of these types of games is that they are quick, easy games that require communication to complete the task in under 1 minute. Sometimes, I will have students continue to work until they finish the task, other times I will time them to see who completes all of the games in the quickest time, and other times I will not time them at all. It’s whatever I think the class needs at the time. The best part is that the Minute to Win It Games require minimal materials, such as, spoons, cups, shoes, toilet paper rolls, and more. You can check out more of the specific games I do by clicking the link at the beginning!

Remember, as students are doing team building activities, like the ones above, they are going to fail! And that is OK! Students learn more from failure than doing everything perfectly each time. I love to do these activities at the beginning of the school year and randomly throughout the year when I find a group is struggling. It really helps students to focus and reflect on what is needed to work together as a team and to be a great teammate.

10 Reasons to Fall in Love with 3Doodler Start

You either came here for 2 reasons - you love 3Doodler or you have no idea what it is, but were intrigued by the name.

Well, 3Doodler EDU is a company that creates 3D-printing pens for children as young as 4 years old. Yes, you read that correctly, 3D-printing PENS! Students have the power in their hands to print a 3-dimensional design. And I’m here to tell you why I love it so much.

image0 (8).jpeg
  1. Easy to Use

    The pens are just the right sizes for students to be able to hold and manipulate when printing. They have one button to turn the pen on/off and another to release the filament. It works much like a pencil or crayon, so students already have background knowledge for using the device.

  2. Low Temperature

    Often times we have to worry about the temperature of various tools in elementary school, but not with the 3Doodler Start pen! There are plastic pieces on the outside of the pen that covers the internal pieces that heat up the filament, so if a student touches any part of the pen, it will not burn them. A huge win!

  3. Introduction to 3D-Printing

    3D-printing can feel like a foreign concept to our youngest learners. 3Doodler pens bridge the gap into using 3D-printers and teaching students the technology behind CAD (computer aided design). Instead they have the opportunity to create their own 2D plan and turn it into a 3D object.

  4. Resource Database

    The 3Doodler website offers resources for teachers to use tutorials, stencils, and lesson plans to instruct them on how to turn their designs into 3D-prints.

  5. Filament is Biodegradable

    It’s important that we don’t lose sight of protecting our environment and 3Doodler has kept this in mind because their filament is biodegradable, which is so important to me.

  6. Trial and Error

    3D-printers can take hours for students to find that their design actually failed. However, with the 3Doodler pens they have control over the whole print since they handle the pen, which does the printing. If they make a mistake mid-print, they can fix it. The filament also takes about 30 seconds to fully harden, so they can manipulate the filament as it comes out of the pen if needed. This provides instant feedback on their design and areas to improve.

  7. Quick Results

    Instead of taking hours to complete a print on a 3D-printer, students can have a finished product in under 30 minutes. It all depends on how detailed their design is and the speed at which they operate their 3Doodler pen.

  8. STEM Learning

    It is the perfect tool for many STEM projects! My students learn the concept of 3D-printing along with the math and science behind the topic of study. For example, when we make bubble wands we discuss symmetry, shapes, how bubbles are created, and the difference between man-made and machine-made products.

  9. Hands-On Application

    Since students physically hold the pen and operate it all aspects of it, they are in control of their 3D-printing. You can’t get more hands-on than that!

  10. FUN!

    Learning should be fun, engaging, and relevant and 3Doodler provides all of this for my students. When students are having fun and engaged, the learning is going to stick with them!

So, do I have you hooked?! I certainly hope so! You won’t be sorry about getting 3Doodler Start for your classroom. You can learn more about their products on their website - 3Doodler.


Are you looking for more content on 3Doodler and how I use it in my classroom? Then check out the blog posts below.

3Doodler STEAM Education

3Doodler Teacher Spotlight

5 Steps to Get Started with Ozobot

Have you heard about Ozobots yet? They’re the cute (yes, I said cute!), robot that can fit in the palm of your hand and they respond to color codes. The robots themselves are pre-programmed to respond in specific ways to a set of color codes that you can either draw on paper or on a digital device, such as a computer or iPad.

Given their size, durability, and required coding skills, they are perfect for students as young as kindergarten!

So you’re wondering how you get started? Follow these easy steps below.

UK0XauiHQCuH._UX938_TTW__.jpg
  1. Turn it On - There is only 1 button on the side of the Ozobot. Hold it down one time and immediately let go to turn it on.

  2. Calibrate It - Your students should learn what this phrase means! You’ll want to calibrate your Ozobot before using it each time. It basically resets the system and you’ll find that it performs better when you do this. Check out this resource to share with your students on how to calibrate your Ozobot.

  3. Draw Lines - Once you have your Ozobot you’ll want to get comfortable with drawing lines of the appropriate size. The markers that come with the Ozobot make the perfect line thickness when you turn the marker sideways and draw a line. You’ll mostly use black lines for the robot to follow and then use a combination of the color codes throughout for your Ozobot to follow. Use the Ozobot Color Code sheet to reference the codes.

  4. Making Mistakes - You’re going to make mistakes as you learn to create lines and codes for your Ozobot to follow and that’s ok! Take time to explore your new robot before you start design challenges.

  5. Have Fun - Collaborate with friends, brainstorm design challenges, and explore a new way to code with your students!

Note: You do not have to memorize color codes! That’s not want learning to code with Ozobots is about. Make copies of the Ozobot Color Code sheet for students and laminate them to keep for longer.


Are you looking to purchase an Ozobot? Check out these products on Amazon - Ozobot Bit and Ozobot Evo.

Do you need an idea about how to secure funding for Ozobots in your classroom? Checkout my blog - How to Get Started on Donors Choose.


Imagineer STEAM partners with affiliate platforms where commission may be earned based on clicks and or purchases, and I would love it if you decided to use the links above! Affiliate links help small businesses, like me, to fund the free content that we provide.

Top 10 Free Breakout EDU Games

Escape rooms provide a highly engaging, collaborative atmosphere for learning! I first fell in love with them outside of the classroom. Going with family and friends to rooms where clues were all over the place and you were challenged with piecing the puzzles together in 1 hour. I wanted to find a way to make this work in my classroom.

And lucky for me, Breakout EDU, did that work for me!

From the moment I received a grant for physical kits and digital games, I had students in all grades (K-5) begging for me to do them with their classes. It’s engagement like that, that gets students learning. So what happens if you can’t do a physical breakout? Well digital breakouts of course!

The best part? Breakout EDU has over 350 free games for educators to access. But sometimes a number like that can feel overwhelming, so I wanted to help you find a place to start! So here are MY top 10 digital Breakout EDU games for you to play with your K-5 students!

Stop+Colloborate+and+Listen.png
  1. Mindful Maddie - My name is Mindful Maddie, and I am here to help you practice mindfulness, no matter what is going on in your life. Grab your family and friends, and work together to solve these clues. In the end, not only will you have broken out, but you will have broken INto my toolbox of mindfulness!

  2. Field Day Fun - It's that time of year! Time to run, jump, toss, bounce and have some fun with friends. The Critter Crew is ready to compete but they need your help! They need you to help them complete the Field Day challenges and unlock their medal! Penny Pig, Marvin Monkey, Pete Penguin, Oscar Owl, Danny Dog and Zelda Zebra are counting on you!

  3. Birthday Party Puzzler - So you're having a birthday, eh? Well not so fast. You need to figure out where we put the party supplies for your big day!

  4. School Daze - What has happened? You clicked on the wrong link, and now nothing makes sense. The room is mixed up and a mess! You need to break free of this School Daze and get your day back on track!

  5. The Lost Ladybug - Lola Ladybug wandered off and found herself lost! She needs your help to get back to her favorite window and the rest of her family.

  6. Keyla’s Carnival Games - Kids are so used to being “plugged in” that they are struggling to wait in line and take turns when playing the party games! Hopefully, these carnival games can keep them engaged and encourage them along the way so we can all have fun!

  7. Danny Plays Putt-Putt - Danny the Dinosaur is a T-Rex. He wants to play Putt-Putt but he needs an extra long club because his arms are too short. There is a shed with long clubs but it is locked. All of his friends are ready to go. Solve the clues and help Danny before it is his turn.

  8. Jenna’s Adaptation Extravaganza - Jenna has been assigned a project to go out into the “real world” and inform people about the importance of adaptations. Would you please do her a favor, and be the first guest on her interactive tour?

  9. Keyla Takes on Natural Hazards - Keyla has learned all about natural hazards through her travel agency. During her travels she has even found herself stuck in a few! Help Keyla show what she knows by reducing the impacts of natural hazards (while traveling safely)!

  10. Neighborhood Picnic - Your mom is planning for your annual neighborhood picnic and she needs your help. Your younger sister got into your moms papers and notes, and now your mom is in a rush to get everything finished before the guests arrive. Help her get everything organized so the picnic can go on as planned.

As you’re clicking on the links, if you find that you’re not directed to the game itself, all you need to do is create a FREE platform access with a email. I promise, it’s worth it.

So dive in with your students! Play a digital escape room game with them. Do it for the team building, enhancing instruction, getting students to collaborate, and think outside of the box!


Do you want to learn more about how to use Breakout EDU in your classroom, whether it’s for in person or virtual learning? Then don’t miss my blog post Escaping Boredom with Breakout EDU.

Are you curious to learn more about the process that goes into writing a Breakout EDU game? Then read about my own process as I wrote a Breakout EDU game in my article Breakout EDU Game Designer.

We Need to Do Better

I’m not sure about you, but for days I have been sick to my stomach. Sick over what I’m seeing and hearing in the news. Sick to think of experiences that my students have had that are so drastically different from my own. Sick to think of the uneasiness my students are currently feeling and not being able to talk about it at school. Normally this would be a time that we could pull up a chair with our students and just talk. However, covid-19 has transformed education in the last few months. I can’t hug my students, I can’t hear about what they did over the weekend, I can’t see them in person, and the list could go on.

I’ll just say it. This sucks. All of it.

Breonna Taylor shouldn’t have died. George Floyd shouldn’t have died.

I look at them and see my students from my first year teaching. They’re almost 18 and it makes me fearful for them. I don’t want them to be the next person on the news.

It’s up to us as white parents and educators to do better. To love more. To teach. To educate. To reform. To be an ally for others.

Because our students deserve it. Their families deserve it. My friends deserve it. And my neighbors deserve it.

It is very simple, Black Lives Matter. I know I will continue to make mistakes as I learn more. But I promise to do better, and our kids are counting on it.


If you’re looking for resources to help you in your journey, please look more into the following. I’m constantly looking for new resources for myself and this is just a small portion of ones that I have found so far. I look forward to finding more.

Anti-Racism for Kids 101: Starting to Talk About Race

A White Families’ Guide to Talking About Racism by Naomi O’Brien and LaNesha Tabb

You’re Kids Aren’t Too Young to Talk about Race: Resource Roundup

#BlackLivesMatter by Michelle Weiss

31 Children’s Books to Support Conversations on Race, Racism, and Resistance

prettygooddesign-too-young-to-talk-about-race-v4-single.png

Ozobot Storage Hack

all of my ozobot boxes that i kept to store the robots, chargers, and packaging.

all of my ozobot boxes that i kept to store the robots, chargers, and packaging.

If you’re a teacher who loves technology, then you have probably used an Ozobot. They’re the cute, tiny robots that code through a variety of specific color combinations.

Like with any piece of technology, it comes with a lot of packaging! And most teachers just don’t have the space to store the Ozobots in the boxes they came in. But you still need a safe storage solution.

So what can you use that doesn’t cost you any extra money?

An egg carton.

Yes, you read that correctly! One of my great teaching partners and fellow STEAM teacher, Mindy Pastuszak, imparted this life changing hack about a year ago and I’m so thankful for it!

I can easily store all of my Ozobot robots and charging cords all in one place, plus I have gained back so much storage room for other building materials. Teachers are always trying to find ways to make their lives easier, and I’m here to tell you, eat those eggs and don’t trash the container. You will thank me later, I promise.


Are you looking for other ideas to help with your classroom storage? Then check out this blog post - Classroom Organization.

image0 (9).jpeg

How to Start 3D-Printing with Students

Have you ever seen a really cool project that you wanted to do with your students, but you didn’t feel confident enough in your own abilities to be able to introduce it to them? Odds are that project had something to do with technology.

Technology is ever changing and let’s face it, we can’t be experts with every single thing. Should that stop us from exposing our students to it?

A large part of our job as a teacher is introducing students to a multitude of career opportunities because how are they supposed to know if they’re interested, if they never have any experience? So let’s go back to the first question - should our inexperience with a piece of technology stop us from teaching our students about it?

image0 (10).jpeg

NO.

It’s ok to not have all of the answers. It’s ok to not be confident with using it. It’s about showing up for our students and learning with them!

And that’s exactly what I did 3 years ago when I did my first project on 3D-printing.

I had never used a 3D-printer in my life, but you know what? I unboxed it, set it up, and got it running (with the help of our fabulous IT person who approved the software download) all by myself. And when I opened the 3D-printers there were no directions. Yes, you read that correctly, no directions. I watched YouTube videos, completed tutorials on Tinkercad, and learned along with my students.

I would constantly tell my 4th and 5th graders, “Ok guys, you’re the first ones to do this. I’ve never used these before, but we’re going to learn together!”

And you know what? They loved it!

I modified my slidedeck for students throughout the unit, adding in tips and tricks that students discovered along the way. We watched the printers run together for the first time and we all felt a huge sense of accomplishment TOGETHER. Because that’s what learning is all about - trial and error. Finding what works and what doesn’t. And most importantly not giving up.

So if you’ve never used a 3D-printer before (or any other technology), learn with your students. Watch YouTube videos, use the Tinkercad tutorials, and don’t be afraid to make mistakes!

IMG_7418-5.gif

Do you want to learn more about what exactly Tinkercad is? Then check out my blog post - Tinkercad.

Do you want to see how I’ve been using 3D-printing to help my local hospitals during Covid-19? Then read my post - 3D-Printing for the Community.

Are your students beginners at using Tinkercad and you don’t know where to start? Then you won’t want to miss my blog post - Tinkercad Projects for Beginners.

Do you not have a 3D-printer, but you’re still interested in using Tinkercad? Then read why you can do just that here - Using Tinkercad Without a 3D-Printer.

5 Ways to Stay Focused While Working at Home

Are you struggling while working from home? You’re being pulled in a million directions and you don’t know which way is up. Let’s face it, our life got turned upside down in a matter of days, or hours for some. While it took me a while to find my groove, I’ve done some self-reflection on what helps me to stay focused while working from home and I want to help YOU!

jess-bailey-94Ld_MtIUf0-unsplash.jpg
  1. To-Do List

    Write a list of what you want to get done for each area of your life, such as work, kids, and home. I like to create to-do lists with everything that has to be done as well as long-term goals. On a sticky note, I write a separate daily to-do list the night before of what I want to get done the next day. This helps me to focus on the exact things I need to do when I have time throughout the day. I try not to put too many things on it, so it is not too overwhelming.

  2. Keep a Schedule

    Do you have kids? Try your best to keep them on a schedule similar to the school year. Maybe their bedtime is a little later and they sleep in a little, but find a new schedule during this time of social distancing and stick to it during the work week. Do you still need to set an alarm for yourself? Then do it! Whatever helps you stay on schedule is important to make you feel like you’re not wasting time throughout the day. You will find your schedule changing sometimes, like my son was sleeping in a lot, but now he is waking up super early. Your schedule requires some amount of flexibility, but having a structure allows much more freedom.

  3. Breaks

    Nothing that we are doing is normal. I’m used to waking up at 5:30am to get ready, quickly get my son ready, and then we run out of the door to head to daycare and work. That just doesn’t happen anymore. We are together all the time (and believe me when I say - I LOVE being together!), but we need breaks. Find a way to bond with your family and take a break from work. Our go-to break is going on a walk. There is nothing like getting some fresh air and just chatting about what we hope to do when this social distancing becomes a thing of the past. If you are able to, carve out some time for yourself by reading a book, watching a show, or going outside.

  4. Close the Computer

    Seems obvious, right? If I close my computer, then I will stop working. But this one is hard. We are working in a digital world and it can be hard to put it away. I’d venture to say that many of us, especially teachers, are working longer hours during distance learning. We’re checking our emails starting at 6am and many of us open up that computer again at 9:30pm. This is something we would rarely do when working in the building. Heck, many of us were asleep by 9:30pm! But in order to be a more productive person, we have to close the computer. We have to stay focused on work during set hours (don’t forget #2!) and we have to close that computer! Believe me, I’m writing this as a reminder to myself too.

  5. ME TIME

    Yes, I wrote it in all caps because it’s that important! It can be hard to find time for yourself when you’re constantly at home with no place to go. However, it’s important for you and your physical and mental health to find something that makes you happy. What do I do? After I put my toddler to bed, I watch tv. It may sound silly, but I have recordings on my DVR of shows that I have fallen behind on because I had a baby, I was busy at work, trying to keep up with the house chores, and the list could go on. But during this time of social distancing and no place to go, my husband and I have intentionally carved out time each night to watch shows we love. Maybe tv is not your thing, but any type of self care will be beneficial for you. Maybe it’s meditation, bath bombs, or exercising.

So can you do it? Can you check off 1 - 5? I challenge you to start finding small ways to help you find structure in your life that may feel so chaotic right now. Because if you can do these, I promise you will feel better!


Are you struggling to manage the work life balance as a teacher? Let’s face it, we could also use more tricks up our sleeve! So check out - 5 Ways to Manage a Work Life Balance.

Using Tinkercad Without a 3D-Printer

So you’ve been seeing my posts about Tinkercad? Or maybe you haven’t because you skip over them due to the fact you don’t have a 3-D printer? I’m here to tell you - you DO NOT need a 3D-printer to use this tool!

So let’s back it up.

Why do we use Tinkercad? Well it’s a computer aided design system that people use to design prototypes in 3D. Are you wondering, again, how is this helpful?

DirkvdM_Schuifmaat_top.png

Let’s think. As teachers what is one of our most important jobs? To prepare our students for future careers!

That career could very well include an architect, engineer, construction management, or drafter. What do all of these professions have in common? They create or use small scale, 3D prototypes to design their large scale projects. And it is up to us as teachers to introduce students to these types of professions through project based learning. And the best part - these professions design in 3D, but they don’t necessarily print their design with a 3D-printer. Instead they use the computer to simulate and modify their design.

By utilizing Tinkercad without a 3D-printer, you can do the same thing! Students can design and modify their design to present to a small group or the whole class to discuss how their prototype in fact matches the requirements needed for the final product. It will lead to discussions on various view-points as the presenter can rotate their prototype on the computer, whether the prototype is to scale, what would happen if it was printed, and so much more.

You see, the 3D-printing is just an added bonus. The real learning comes from using the design program, working through the struggles of creating the prototype, and the discussion that comes after the prototype is completed on Tinkercad.

So don’t wait for a 3D-printer to start using Tinkercad because your students are missing out on valuable learning!


Explore more on the Tinkercad website.

Do you want to learn more about what exactly Tinkercad is? Then check out my blog post - Tinkercad.

Do you want to see how I’ve been using 3D-printing to help my local hospitals during Covid-19? Then read my post - 3D-Printing for the Community.

Are your students beginners at using Tinkercad and you don’t know where to start? Then you won’t want to miss my blog post - Tinkercad Projects for Beginners.

5 Ways to Build with Magna-Tiles

If you don’t already know what Magna-Tiles are, you can probably infer from the title…magnetic tiles! Your second thought might be, “How versatile can these really be in my house or classroom?”

IMG_0332.JPG
  1. Imaginative Play

    This is probably the most obvious use because it’s important for kids of all ages to have time to use their imaginations and just build. If we stifle their imaginations by always giving them a specific structure to replicate or design, then it will only be harder for them to think outside-of-the-box in the long run.

  2. 2D & 3D Shapes

    The Magna-Tiles come in all shapes and sizes and are a great tool for students in grades K - 2 to identify the shapes they are building with. As they get older they can use multiple terms to identify shapes. For example, start out broad with a parallelogram and get more specific in identifying the shape. Then push their thinking to go from using 2D shapes to create 3D shapes. How many squares do you need to build a cube? How many faces does it have? Sides? Vertices? The math talks are endless with these tiles!

  3. Prototyping

    All engineers and architects create prototypes or scaled models of what they want their final build to resemble. As teachers, we need to instill the idea of practice and modeling into our students. A variety of tools can be used to create prototypes, but the Magna-Tiles offer a quick and easy way to build, modify, and recreate in a matter of minutes.

  4. Science

    Half their name says it all - magnets! These tiles stick together thanks to magnetic forces and we would be amiss if we didn’t take this as a learning opportunity to teach our students about magnets. Push, pull, the poles of a magnet, what types of surfaces are magnetic, and the list could go on!

  5. STEAM Challenge

    Students learn when they are challenged. As a STEAM teacher, my students learn through project based learning. I give them a challenge, they plan, build, and test. You can do the same with Magna-Tiles! And guess what - you can even link the building to literature! For example, read the story The Three Little Pigs and challenge your students to build a house with the Magna-Tiles that the wolf cannot blow down. Or you can challenge them to build a rocket to be sent on a mission to Mars, a train that can hold 5 passengers, and so much more!

Learning should occur through hands-on instruction and Magna-Tiles offer that perfect avenue. So grab some for your classroom or kids at home! You won’t be sorry!


Are you looking for other tools that students can build with? Then check out the blog post - Building Materials.

Are you trying to add consumable materials to your list? Then you don’t want to miss the blog post - STEAM on a Budget.


Imagineer STEAM partners with affiliate platforms where commission may be earned based on clicks and or purchases, and I would love it if you decided to use the links above! Affiliate links help small businesses, like me, to fund the free content that we provide.

Flipgrid Disco Library

You probably read this title and thought, “Why is Flipgrid dancing to 70s music?” Well, they did their job, didn’t they? They hooked you into wanting to learn more about what this library actually is! You see, it has nothing to do with music. In fact, it’s called Disco Library because it sounds a lot more fun than Discovery Library!

discoveryLibrary.jpg

So what exactly is this library for?

It is a place where more than 10,000 community-generated topics live!

Teachers can find inspiration for their own topics and use other ideas that educators have shared. You’ll find exit tickets, book clubs, a variety of ideas to connect with families during distance learning, reading fluency practice, and so much more! Flipgrid has also partnered with amazing organizations such as California State Parks, MSN Kids, and The Metropolitan Museum of Art, as well as educators from around the world.

Once you find a topic that you want to use with your students, you are able to take that exact topic and integrate it into your own grid for students to see. While in the grid you can customize this topic like you would any other Flipgrid topic that you create! Before you know it, you will be connecting as a class and learning more about your students!

If you’re looking for more details about how to integrate topics from the Flipgrid Disco Library, then read more on their blog - Dancing Through the Disco Library.


Need to go back to the basics and learn more about Flipgrid? Then checkout my blog post - What is Flipgrid?

Want to learn how to combine augmented reality with Flipgrid? Then read my blog post - FlipgridAR.

Are you wondering how Flipgrid can easily integrate into distance learning? Then don’t miss my blog post - Remote Learning with Flipgrid.

Tinkercad Projects for Beginners

Teachers are always trying to find new, fresh ideas to get their students learning. With technology constantly advancing it can sometimes be hard to keep up with it all. But as a STEAM Teacher, that’s my job! One area that is growing at a rapid rate, is 3D-printing. A variety of companies are using it - NASA, medical, automotive, industrial, military, and the list could go on.

I’ve mentioned before that as a teacher, it’s my job to expose my students to a multitude of career fields because how are they to know if they are interested in something if they’ve never even heard of it? This is exactly why I do 3D-printing in my classroom with elementary schoolers! And guess what - they’re all beginners. Everyone has to start somewhere and the beginning can be the best place to start!

So what 3D-printing projects can I do with students who have no experience with CAD systems (computer aided design systems - a software architects use)? That’s easy. I break down the content to something that is relatable to them.

  • bubble wands

  • backpack key chains

  • personalized game pieces

  • parts to a larger project that students are making

  • dice

  • letters of the alphabet

  • bookmarks

  • a toy for a younger child

  • model of animal that a student is researching

  • luggage tag

By using Tinkercad, students are able to manipulate pre-made shapes, draw their own shapes, and add details as they see fit. Since Tinkercad is a software for beginners, my students can go into a project with zero knowledge of even the concept of 3D-printing and come out with designs that are fully printed. Your students can be just like mine - going into the project not knowing what 3D-printing was and came out having designed a unicorn bubble wand. So be that unicorn in a sea of horses.


Do you want to learn more about what exactly Tinkercad is? Then check out my blog post - Tinkercad.

Do you want to see how I’ve been using 3D-printing to help my local hospitals during Covid-19? Then read my post - 3D-Printing for the Community.

bubble wand.png

Remote Learning with Flipgrid

Who would have ever thought that we would deal with a situation where our jobs as teachers were completely reversed? Certainly not me. It still seems surreal, even 7 weeks in, to wake up each morning and walk downstairs to my couch to get started on work for the day. No longer do I have a STEAM classroom full with students, technology, and building materials, but instead all I need is my computer to get the days going.

One of the biggest things that educators can do right now for their students is to continue building relationships and keep students engaged. A large part of relationship building is face-to-face interaction, which can be hard during distance/virtual learning. So we must utilize tools that will help us.

Cue Flipgrid.

I hope you’ve heard of it! If not, lucky you because you’re in for a treat. This tool is perfect both in the classroom and for remote learning. It will allow you to keep students engaged as they see your face and those of their classmates.

I’m sure you’re #1 question is, “How do I use this for remote learning?!” As the teacher you want to create a topic that students can respond to. You can even create a video discussing the topic with students. This allows your students to see you, giving them that sense of security, that yes, their teacher is still here for them. Because let’s face it, they can read the words in an email or on a website, but it is our voices and faces that give them a sense of normalcy.

Topic Ideas:

  1. morning meeting topic response

  2. book talks

  3. project demonstrations

  4. read alouds

  5. math conversations

You can get started on Flipgrid in less than 10 minutes. Try one of these topics! See how it goes with one topic and if it works for you and your students, build on that. Connect with them. Continue to build those relationships because the school year isn’t over, yet!


If you are looking for more information to get started on Flipgrid, then you don’t want to miss my blog post - What is Flipgrid?

What to broaden your knowledge of Flipgrid even more? Check out how you can use augmented reality with Flipgrid now - FlipgridAR!

If you’re looking for more tools in flipping the classroom, then check out my post - Flipping the Classroom.

You know you want to start with Flipgrid, but you’re not sure what a good topic is? Then learn more about their library that holds more than 10,000 user-generated topics - Flipgrid Disco Library.


Resource Goes Remote

Are you part of a Resource Team? Most of us naturally think of music, art, PE, library, STEAM, or other similar classes.

Transitioning to a world where we’re now completing distance learning, I had a hard time wrapping my head around what that would look like for a Resource team. I’m used to seeing 850 students in a span of one week. How am I going to replicate that model through distance learning? And let’s be real - you can’t. Just like classroom teachers cannot replicate their teaching for 25 (ish) students, we cannot replicate our teaching for the entire school.

So as team leader, I wanted to find a model that would work for my team, my students, and my parents. I wanted something that offered choice, minimal materials, hands-on learning, and time to bond as a family. Does all of this sound like something you were striving for to? I’m sure it is and it wasn’t easy, was it? Especially as a STEAM teacher. I think of my classroom and the many materials I have acquired through grants, donations, and stretching the little bit of money I have. The experiences that I am able to provide my students in the classroom just aren’t possible through a computer screen. But I also knew that there were still many learning opportunities from home.

So what did I land on? A Bingo board.

I assigned each letter in “Bingo” to a different member of my team. We’re even lucky to have a Wellness Integrator at my school, so we sprinkled in wellness-driven lessons within each of the Resource content areas. I encouraged my team to create plans that all students would have access to. Think minimal materials because we don’t want parents having to drive to the store, library, or a friend’s house. We also loved the idea of a Bingo board because for families that have children across multiple grade levels, they could complete the same activity together. They would never have to feel the need to ensure there children are completing a specific assignment, and the choice offers students autonomy to pick something that interests them. We know that it is hard to keep students engaged during distance learning, but if you give them choice in their learning, they’re more likely to want to engage in the work, thus retaining what they learned.

While none of this distance learning is ideal, I feel confident that we’ve found a model that helps students learn, take some of the pressure off of parents, and keeps our students engaged. So take a peek! Download the Bingo board for yourself and get your students learning!

Resource Bingo Board

FlipgridAR

You maybe a pro at using Flipgrid in your classroom or you maybe new to the world of Flipgrid, either way you are going to want to stick around to learn how to integrate more into your Flipgrid usage.

Have you ever heard of AR? Augmented reality. It’s the idea of taking virtual elements and presenting them in the physical world. Think back to a few years ago when Pokemon Go was all the rage. People could take their phone, hold it up, and “see” various Pokemon in their neighborhood, park, house, or really anywhere. The phone acted as a tool to visualize something around you that wasn’t actually there.

maxresdefault.jpg

Flipgrid has taken this technology and created a way for teachers to use AR in their classrooms. You maybe wondering how this is applicable in your classroom.

Just wait.

Have you ever walked around your own school and seen posters and papers on bulletin boards? Ok, we all have. Now have you ever wondered what type of work went behind that one piece of paper?

As teachers we all know a lot of work goes behind the final product, but how can we share that with others? Flipgrid AR.

After students create videos in Flipgrid, the teacher has access through their Educator Admin account to download a QR code for each video. You can tape the QR codes beside the student’s final product. As administrators, parents, and other teachers walk through the hallway all they need is their phone to pull up the video to listen to all of the learning behind that final product that is displayed!

Is your mind blown?! Mine certainly is. It is a game changer because you can bring student voice back to a stagnant product.

You maybe wondering how you can utilize this tool in your own classroom. Checkout this list:

  • family nights

  • homework

  • school events

  • book reviews

  • Science Fairs

  • student art galleries

  • send a personal message home

  • certificates

  • anything that comes to mind!

If you’re looking for step-by-step instructions to set up FlipgridAR, see how Flipgrid is here to help!


Are you not sure how to get started on Flipgrid? Then checkout my blog post - What is Flipgrid?

You know you want to start with Flipgrid, but you’re not sure what a good topic is? Then learn more about their library that holds more than 10,000 user-generated topics - Flipgrid Disco Library.

Are you wondering how Flipgrid can easily integrate into distance learning? Then don’t miss my blog post - Remote Learning with Flipgrid.